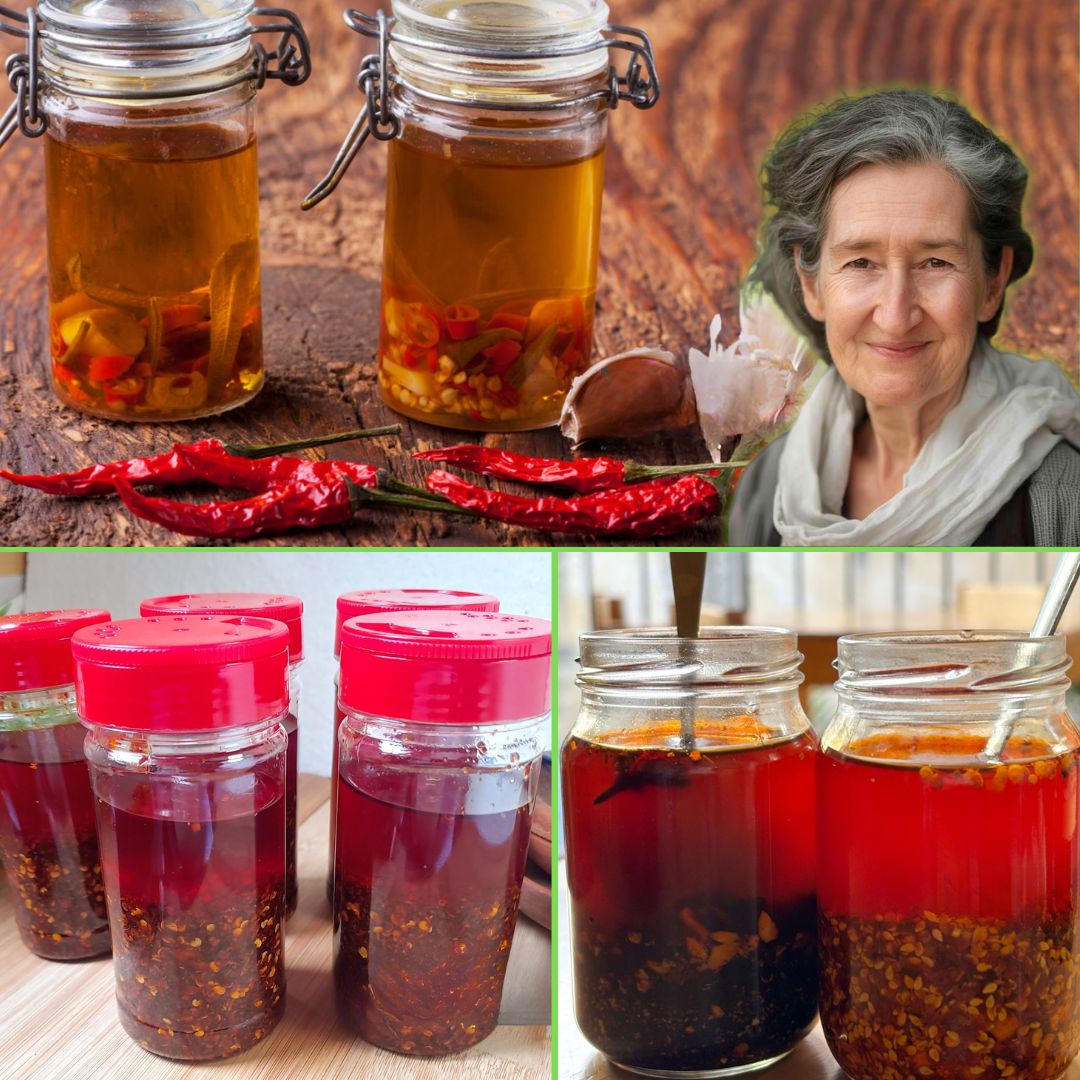
Homemade Chili Garlic Sauce – Spicy, Savory & Easy to Make
Introduction
If you love bold flavors with a punch of heat, making your own homemade chili garlic sauce is a game changer. This spicy, savory condiment adds an irresistible kick to everything from noodles and dumplings to stir-fries and grilled meats. Unlike store-bought sauces loaded with preservatives and artificial flavors, crafting your own chili garlic sauce at home lets you control the heat, texture, and freshness — all in just minutes with simple ingredients you probably already have.
Chili garlic sauce isn’t just a condiment; it’s a culinary staple that brings depth and warmth to your meals. Whether you’re craving a fiery dip, a cooking base, or a marinade, this versatile sauce is your kitchen’s secret weapon. Plus, the intoxicating aroma of garlic and chilies simmering together is sure to brighten your cooking experience.
Ready to learn how to whip up this flavorful sauce yourself? Let’s explore why this homemade recipe stands out and how you can master it easily in your own kitchen.
Why You’ll Love This Recipe
This homemade chili garlic sauce recipe stands out because it combines heat, savory richness, and a perfect balance of tang and sweetness — all without complicated steps or hard-to-find ingredients. Unlike some chili sauces that rely on long fermentation or artificial additives, this quick-cook version keeps things fresh and vibrant.
You’ll love this recipe because:
- It’s incredibly easy and fast: You can have a batch ready in under an hour, much faster than fermenting traditional chili pastes.
- Customizable heat level: Siling Labuyo chilies pack a punch, but you can adjust the type and amount of chili to suit your palate. For milder heat, try substituting with jalapeños or red chili flakes.
- Perfect balance of flavors: The combination of garlic, sugar, vinegar, and oyster sauce delivers a complex savory taste that elevates any dish.
- Versatile condiment: Use it as a dipping sauce, marinade, stir-fry base, or even as a spicy spread on sandwiches.
- Long shelf life: Stored properly in a clean jar, this sauce can last weeks, letting you enjoy that fresh homemade flavor anytime.
This recipe is perfect for anyone wanting to bring authentic heat and flavor into their cooking without resorting to store-bought bottles.
Ingredients
Here’s what you’ll need for a classic batch of homemade chili garlic sauce:
- 250 grams Chili (Siling Labuyo) – These small but fiery Filipino chilies are the star of the show, packing intense heat and flavor.
- 150 grams Garlic (approximately 3 large heads) – Fresh garlic lends a pungent, aromatic foundation.
- 3 cups cooking oil – Neutral oils like vegetable or canola oil work best for frying and blending.
- 2 tablespoons sugar – Balances the heat with a subtle sweetness.
- 1 tablespoon salt – Enhances all the flavors.
- 2 tablespoons vinegar – Adds tang and acts as a preservative.
- 1 teaspoon ground black pepper – Adds a mild heat and complexity.
- 1 tablespoon oyster sauce (optional) – Introduces a savory umami depth but can be skipped for a vegan version.
All these ingredients are simple, affordable, and often found in Asian or international grocery stores. For a slightly different twist, you can experiment with other chili varieties like Thai bird’s eye chili or serrano peppers.
Necessary Tools
You don’t need fancy gadgets to make this chili garlic sauce, but having the right tools will make the process smoother and more enjoyable:
- Blender or food processor: Essential for chopping the chilies and garlic into fine pieces without turning into a puree.
- Large frying pan or wok: For cooking the chili mixture evenly over low-medium heat.
- Measuring spoons and cups: To ensure the correct balance of ingredients.
- Wooden spoon or spatula: For stirring the sauce continuously to prevent burning.
- Clean glass jars with lids: For storing your finished sauce safely and keeping it fresh.
- Knife and cutting board: For prepping chilies and garlic if you prefer to roughly chop before blending.
Ingredient Swaps and Additions
The beauty of this recipe is its flexibility. Feel free to customize based on your preferences or what you have on hand:
- Chili substitutes: If Siling Labuyo is too hot or unavailable, substitute with fresher jalapeños, serrano peppers, or even dried chili flakes. Adjust quantity according to desired heat.
- Oil options: Coconut oil or sesame oil can add a fragrant twist, but use neutral oils if you want the pure chili-garlic flavor to shine.
- Sweeteners: Replace sugar with honey, maple syrup, or coconut sugar for a different sweetness profile.
- Vinegar alternatives: Rice vinegar or apple cider vinegar work well if you prefer a milder tang.
- Additional flavor boosters: Add a teaspoon of smoked paprika for a smoky note or a splash of soy sauce for extra umami.
- For vegan version: Simply omit oyster sauce or replace it with a mushroom-based vegan oyster sauce substitute.
Step-by-Step Instructions
Now let’s make your homemade chili garlic sauce step by step, with tips to ensure it comes out perfect:
- Wash and prepare chilies:
Thoroughly rinse the Siling Labuyo chilies and remove their stalks. This ensures no dirt or bitterness affects the sauce. - Blend chilies and garlic:
Place the chilies and peeled garlic into your blender or food processor. Add the cooking oil and pulse for a few seconds until you get small bits but not a complete puree. Over-blending can make the sauce too watery or lose texture. - Cook the mixture:
Transfer the blended mixture to a large pan or wok. Cook over low to medium heat, stirring continuously to prevent burning. You’ll notice the chilies change color and the aroma intensifies — this usually takes about 20 to 25 minutes. - Add seasonings:
Stir in the sugar, salt, ground black pepper, and optional oyster sauce. Mix well until the sugar dissolves and the sauce thickens slightly. - Add vinegar carefully:
Pour in the vinegar but do not stir for 3 minutes. Let it boil undisturbed to cook off the “raw” vinegar taste. After 3 minutes, stir and continue cooking for another 20 minutes on low heat. - Cool and jar:
Once the sauce looks thick and rich with the garlic and chili cooked through, remove from heat and let it cool completely. Transfer into a clean dry jar with a tight lid for storage.
Pro Tips for Success
- Use fresh ingredients: Fresh garlic and chilies have brighter flavor and more heat. Avoid using old or dried-out produce.
- Maintain low heat while cooking: Cooking slowly prevents burning and bitterness. Stirring continuously keeps the mixture evenly cooked.
- Don’t skip the vinegar resting step: Letting the vinegar boil without stirring is crucial to mellow out harsh acidity.
- Adjust oil quantity: If you want a thicker sauce, reduce oil slightly or simmer longer. For thinner sauce, increase oil.
- Sterilize your jars: Ensure your storage jars are properly sterilized to prevent mold and extend shelf life.
For advanced kitchen hacks to enhance flavor and safety, check out the Serious Eats guide on chili sauces.
Serving Suggestions
This chili garlic sauce is incredibly versatile and enhances many dishes:
- As a dip: Perfect with dumplings, spring rolls, or grilled meats.
- Noodle topping: Spoon over stir-fried or cold noodles for an instant flavor upgrade.
- Marinade base: Mix with soy sauce and honey for a spicy-sweet meat marinade.
- Soup enhancer: Add a spoonful to broth-based soups for depth and heat.
- Spread: Use as a spicy condiment on burgers or sandwiches.
Storing and Reheating
- Storage: Store the sauce in a clean airtight jar in the refrigerator. It will keep fresh for up to 3 weeks due to the vinegar and oil content.
- Shelf life: For best flavor, consume within 3 weeks. If you notice any off smells or mold, discard immediately.
- Reheating: Gently warm the sauce on the stovetop or microwave before serving if desired. Avoid overheating to preserve flavor and texture.
- Freezing: You can freeze in small portions for longer storage, but texture might change slightly on thawing.
Learn more about safely preserving homemade sauces in our post on how to store homemade condiments.
Nutritional Information
Approximate values per tablespoon (15 ml) serving:
- Calories: 120
- Total fat: 14 g (mostly from cooking oil)
- Sodium: 300 mg (from salt and oyster sauce)
- Carbohydrates: 1.5 g
- Sugar: 1 g
- Protein: 0.2 g
- Vitamin C: Moderate (from fresh chili and garlic)
This sauce is rich in antioxidants from garlic and chili and contains healthy fats, but also watch sodium intake if you consume in large amounts.
FAQs
1. Can I use other types of chilies?
Yes! You can substitute Siling Labuyo with any chili you prefer. Just adjust quantity based on heat level.
2. Is oyster sauce necessary?
No, it’s optional. Oyster sauce adds umami but can be omitted for a vegan or allergy-friendly version.
3. How spicy is this sauce?
This recipe is quite spicy due to Siling Labuyo. Adjust by using fewer chilies or milder varieties.
4. Can I make this sauce in advance?
Absolutely! It tastes even better after resting a day or two in the fridge as flavors meld.
5. How do I know when the sauce is done cooking?
The sauce is ready when it thickens, changes color slightly, and garlic is cooked through but not burnt.
Conclusion
Making your own homemade chili garlic sauce is a rewarding kitchen project that brings bold heat and complex savory flavors to your table. With simple ingredients and straightforward steps, this sauce elevates everyday meals and opens doors to endless culinary creativity. Whether you’re a spice lover or a curious cook, this recipe lets you harness authentic Filipino flavors in your own kitchen easily.
Give it a try, store it in a jar, and watch how a spoonful transforms your dishes — from noodles to grilled meats — into fiery, flavorful delights. Hungry for more Asian-inspired homemade sauces?